Thursday, May 31, 2012

cake batter truffles


I hope this post brings back happy memories of sprinklers, flip-flops, freeze tag, and other care free summer moments. Memorial Day has come and gone marking the beginning of summer in my book. And this truffle to me is a little package of happy summer moments.  Even as an adult, I still love a funfetti cupcake above all others. Why is that? What is it about adding sprinkles to a vanilla cupcake that puts a smile on my face. Now I suppose I enjoyed a funfetti cupcake more than just in the summer moments, but for some reason it just screams back yard barbeque and pool parties. 


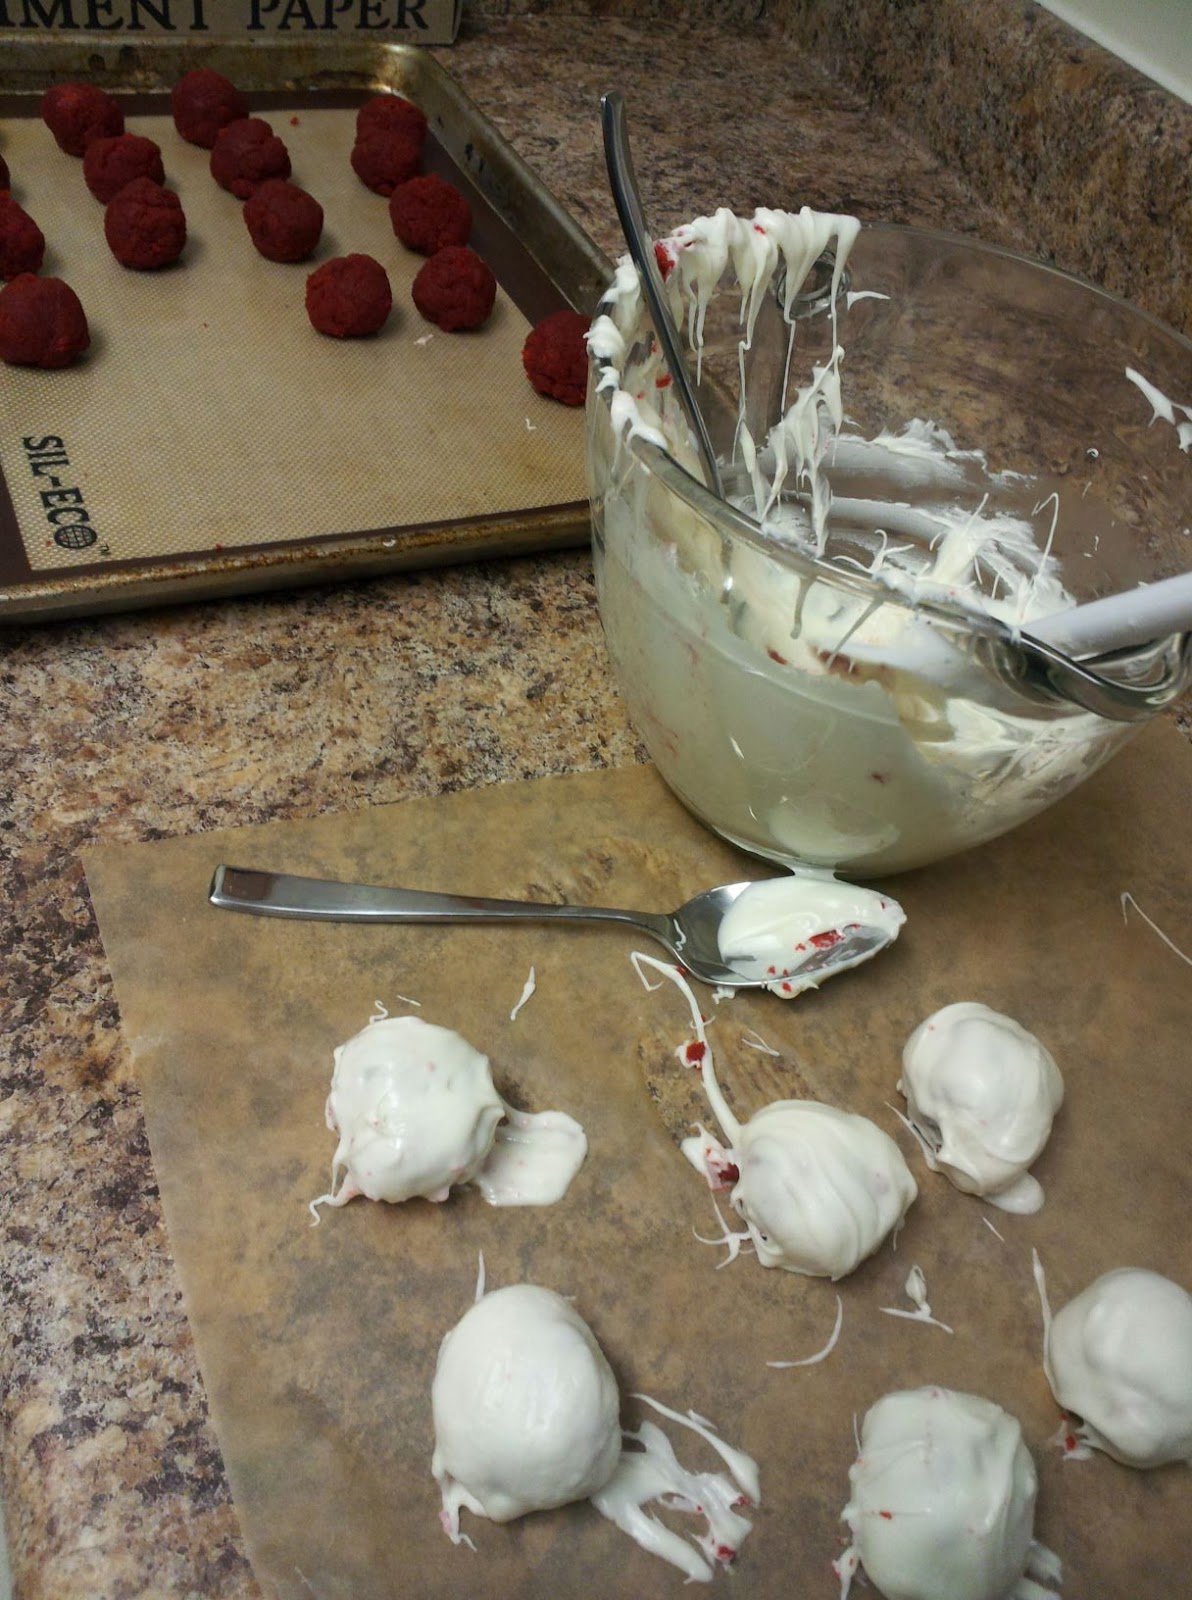
This is a little twist on the funfetti cupcake- cake batter truffles. You can definitely use whatever vanilla cupcake and vanilla buttercream you would like to make these truffles. I chose a recent recipe I posted earlier about. Why? Well, yes those cupcakes were phenomenal. But like the red velvet cupcakes that recently turned into cheesecake truffles, I had leftover vanilla cupcakes in the freezer that succumbed to the same cake truffle fate. Not a bad way to go if you ask me. Roll me in sprinkles and dip me in white chocolate. You won't hear any complaints for me. 


Happy Beginning of Summer everyone. 

Vanilla Cupcakes
Adapted from Annie's Eats


For this recipe I had about a dozen leftover cupcakes. I also used about a half portion of the frosting. I added 1-2 Tbs. of sprinkles. This is one of those "eyeball" recipes. I added enough frosting so the cake crumbs came together, and enough sprinkle to satisfy my soul. 
Please note: the original recipe called for vanilla bean. I, having none on hand  (Let's face it vanilla beans are't cheap!) I simply doubled the vanilla extract to 2 tablespoons. If you choose to use the bean (and I only imagine it can enhance an already great cupcake) scrape the vanilla bean seeds into the bowl of the mixer with the butter and discard the pod (or reserve for another use.)  

Ingredients:
3 cups cake flour
1 tbsp. baking powder
½ tsp. salt
16 tbsp. unsalted butter, at room temperature
2 cups sugar
5 large eggs, at room temperature
1¼ cups buttermilk, at room temperature
2 tbsp. vanilla extract
Directions:
1. Preheat the oven to 350° F.  Line two cupcake pans with paper liners.  Set aside.
2. In a medium mixing bowl, combine the cake flour, baking powder and salt.  Whisk together and set aside. 
3.Add the butter to the bowl of an electric mixer fitted with the paddle attachment.  Beat on medium-high speed for 3 minutes, until light and creamy in color.  Scrape down the sides of the bowl and beat for one more minute.
4.Add the sugar to the butter mixture, ¼ cup at a time, beating 1 minute after each addition.  Mix in the eggs one at a time until incorporated.  Scrape down the sides of the bowl after each addition.  Combine the buttermilk and the vanilla extract in a liquid measuring cup.  With the mixer on low speed, add the dry ingredients alternately with the wet ingredients, beginning and ending with the dry ingredients and mixing just until incorporated.  Scrape down the sides of the bowl and mix for 15 seconds longer.
5.Divide the batter between the prepared paper liners, filling each about 2/3 of the way full (you will likely have batter left over after filling 24 wells.I managed to make a full 3 dozen cupcakes)  Bake 18-22 minutes, or until a toothpick inserted in the center comes out clean.  Allow to cool in the pans 5-10 minutes, then transfer to a cooling rack to cool completely.  Replace paper liners and bake remaining batter if desired.  Frost cooled cupcakes as desired.
Yield: approximately 30 cupcakes (like I said I got 36 cupcakes!)


Easy Vanilla ButtercreamIngredients:20 tbsp. (2 ½ sticks) unsalted butter, softened2 ½ cups confectioners’ sugar, sifted1/8 tsp. salt2 tsp. vanilla extract2 tbsp. heavy cream  Directions:In a stand mixer fitted with the whisk attachment, beat butter at medium-high speed until smooth, about 20 seconds.  Add confectioners’ sugar and salt; beat at medium-low speed until most of the sugar is moistened, about 45 seconds.  Scrape down the bowl and beat at medium speed until mixture is fully combined, about 15 seconds.  Scrape bowl, add vanilla and heavy cream, and beat at medium speed until incorporated, about 10 seconds.  Then increase the speed to medium-high and beat until light and fluffy, about 4 minutes, scraping down bowl once or twice.  


Tuesday, May 29, 2012

red velvet cheesecake truffles


What makes red velvet cake better? Add cheesecake. I had some leftover red velvet cupcakes in the freezer that were taking up way too much space. I wanted to do something different with them then simply de-frost and ice with frosting. (Not that it would be a bad idea.) That was when I found this recipe, for carrot cake truffles, originally from Momofuku Milk Bar. These are similar to a cake pop, but instead of combining cake crumbs with frosting, you combine it with what is called liquid cheesecake. It is cupcake meets cheesecake meets truffle. Sorry bikini season..you are just going to have to wait.

To make the liquid cheesecake:


 With a mixer, cream the cream cheese for two minutes.


Add the sugar. 


Cream for another 3-4 minutes until smooth.


In another bowl, combine the cornstarch and salt. Then add your milk and egg and whisk until it is all combined.


Combine the egg mixture with the cream cheese mixture. Mix until combined. Then pour into a lined pan. Then Bake!

For the cake crumbs:


In a bowl, crumble the cupcakes with a fork. Until they look like this:


Then add the liquid cheesecake and roll into balls.


Roll in white chocolate and let cool. This process will be messy! (At least it was for me)


For the red velvet cupcakes (for this recipe I used 12 cupcakes)

2½ cups cake flour
1½ cups sugar
1 tsp. baking soda
2 tbsp. cocoa powder
1 tsp. salt
2 large eggs
1½ cups vegetable oil
1 cup buttermilk
2 tbsp. (1 oz.) liquid red food coloring
1 tsp. vanilla extract
1 tsp. distilled white vinegar
For the frosting:*
8 oz. cream cheese
5 tbsp. unsalted butter, at room temperature
2 tsp. vanilla extract
2½ cups confectioners’ sugar, sifted
Directions:
Preheat the oven to 350° F.  Line cupcake pans with paper liners.  In a medium bowl, combine the cake flour, sugar, baking soda, cocoa powder and salt; whisk to blend.  In the bowl of an electric mixer, combine the eggs, vegetable oil, buttermilk, food coloring, vanilla and vinegar.  Beat on medium speed until well blended.  Mix in the dry ingredients on low speed and beat until smooth, about 2 minutes.
Divide the batter evenly between the prepared liners.  Bake, rotating the pans halfway through baking, until a toothpick inserted in the center comes out clean, about 18 minutes.  Let cool in the pans 5-10 minutes, then transfer to a wire rack to cool completely.
To make the frosting, combine the cream cheese and butter in the bowl of an electric mixer.  Beat on medium-high speed until well combined and smooth, about 2-3 minutes.  Mix in the vanilla extract.  Gradually beat in the confectioners’ sugar until totally incorporated, increase the speed and then beat until smooth.  Frost cooled cupcakes as desired. (I used a large, unlabeled star tip to frost these cupcakes.)
 

For the liquid cheesecake:
8 oz. cream cheese
3/4 c. white sugar, granulated
1 tbsp. cornstarch
1/2 tsp. salt
2 tbsp. milk, whole
1 large egg
Preheat oven to 300°.
Put cream cheese into a medium sized bowl and, using an electric mixer, beat on medium speed for 2 minutes. Scrape down the sides of the bowl with a spatula. Add the sugar and mix for 1-2 minutes until the sugar has been completely incorporated. Scrape down the sides of the bowl.
Whisk together the cornstarch and salt in a medium bowl. Whisk in the milk in a slow, steady stream, then whisk in the egg until the slurry is homogenous.
With the mixer on a medium-low speed, stream in the egg slurry. Paddle for 3-4 minutes until the mixture is smooth and loose. Scrape down the sides of the bowl.
Line the sides and bottom of a 6″ x 6″ baking pan with plastic wrap. Pour the cheesecake batter into the pan and bake for 15 minutes. It is done when it is set on the edges but still jiggly in the center. If the edges aren’t quite set, bake for 5 minute increments until it’s done, no more than 25 minutes.
Cool completely to finish the baking process and allow the cheesecake to set. It will be creamy and spreadable and can be stored in the fridge in an air-tight container for up to a week. 


For the truffles:
Please note: I used 12 regular sized cupcakes for this recipe so I had a little bit more than the recipe called for, I just added a few more tablespoons of the liquid cheesecake. I was able to get almost 2 dozen truffles with the cupcakes. If you don't have red velvet? Feel free to use any flavored cupcake. I just happen to have red velvet in my freezer.

3-4 c. cake scraps
2-4 tbsp. liquid cheesecake
white chocolate, melted

Combine the crushed-up cake with 2 tablespoons of the liquid cheesecake. Mix using your hands. If it is moist enough to knead into a ball then you’re set, if not add some more liquid cheesecake until it will hold its shape. Portion out 12-14 balls of the mixture.

Dip each ball of cake into the white chocolate until well coated. Place finished truffles on parchment paper and put them in the fridge for at least 5 minutes to fully set the chocolate before serving. Truffles can be stored in an airtight container for up to a week.

Saturday, May 26, 2012

nutella scones

These scones are WICKED good. Now if you are from the New England area, you know that wicked is a the highest form of a compliment. These. Are. Good.  No, better than good. What's better than good? Well...these scones are! If you haven't crawled out from under the same rock I had been under most of my life where nutella did not exist, then let me give you a lending hand. Nutella is to put it simply a chocolate hazelnut spread. Sounds so innocent right? Then you open up the jar, tear back the shiny gold covering, and dip your finger in it (because who is looking right?) And you taste..and you sigh and smile. Everything for that moment is right in the world.

I had leftover heavy cream and (believe it or not) an unopened jar of Nutella just sitting there taunting me from the cupboard shelves. I found this recipe for Nutella scones from the Baked cookbook. I have also tried making their sweet and salty cake (a recipe I have yet to share, but was equally delicious).  These scones were a bit crumbly in the process. I added a few more tablespoons of heavy cream. Not sure if that was the way the dough was suppossed to be or if it was the lovely sunny day wreaking havoc on my scones. Either way, I proceeded. The entire scone dough once mixed and turned out onto the surface, gets a nice thick layer of Nutella spread it over. Then you simply roll the dough back up and flatten it back into a circle and cut into wedges.

These scones were a tad dry, as scones can sometimes be. The Nutella drizzle over the scones does help. How do you make it even better? Don't drizzle..spread a nice thick layer of Nutella over the scones once cooled. I know...it's wicked. But oh is it so, so good.

Nutella Scones

Please note:  I omitted the hazelnuts. After searching every grocery aisle twice with no luck finding them, I gave up on adding hazelnuts to my recipe. The crunch would have been nice, but they were still good with out.  Feel free to add or omit hazelnuts to your scones. Whatever you do though,do not omit this recipe from your life.

There is also a great step-by-step tutorial of how to make these scones here.

Yield: 6-8 scones
Ingredients:
2 cups unbleached all-purpose flour
1/4 cup granulated sugar
1/4 cup dark unsweetened cocoa powder (like Valrhona)
1 tablespoon baking powder
1/2 teaspoon salt
6 tablespoons (3/4 stick) cold unsalted butter, cut into chunks
1 large egg
1/2 cup heavy cream
3/4 cup toasted hazelnuts,coarsely chopped
1/2 cup Nutella

*Baked Note*
Matt & Renato’s advice: Do Not Knead Too Much. Stop working the dough the minute it comes together and don’t worry if there are a few dry bits scattered throughout.
Directions:
Preheat the oven to 375 degrees F and place the rack in the center. Line a baking sheet with parchment paper. In a large bowl, whisk the flour, sugar, cocoa powder, baking powder, and salt until combined.
Add the butter. Use your fingertips to rub it into the flour until the butter is pea size and the mixture is coarse.
In a separate bowl, whisk together the egg and cream. Slowly pour the wet ingredients into the dry ingredients and stir until the dough just comes together. Gently and briefly knead the dough with your hands. Add the toasted hazelnuts and knead gently to incorporate. Flatten the dough into a rectangle approximately 6 by 12 inches. ( it doesn’t need to precise) and spread 1/4 cup of the Nutella on top in a criss cross pattern.  Roll the dough up to make a cylinder about 6 inches long, turn it on its end, and gently flatten it into a disk about 1 3/4 inches high. Do not overwork the dough.
Cut the dough into 6 or 8 wedges and place them on the prepared baking sheet. Bake the scones for 18-20 minutes, rotating the baking sheet halfway through, or until a toothpick inserted into the center of a scone comes out clean. Do not overbake. Transfer the scones to a wire rack to cool completely. Place the baking sheet with the parchment still on it underneath the rack.

Assemble the Nutella Scones:
Heat the remaining 1/4 cup Nutella in a microwave until pourable, about 10 seconds on high. Pierce the tops of the scones a few times with a fork. Use a spoon ( or two spoons-one to scoop, one to scrape) to drip the warm Nutella in a zigzag pattern over the tops of the hot scones. Transfer them to a refrigerator to set for 5 minutes, then serve immediately.

Most scones have a lifespan of 24hours or less; however, these scones taste pretty darn good on day two provided you wrap them tightly and store them at room temperature.

Tuesday, May 22, 2012

Spinach and Ricotta stuffed shells

  Photo courtesy of Cooking Light

I have to admit I have never made stuffed shells. And if we are being honest here, it always seemed like it would be a time-consuming meal. Here is something to know about me. I can spent 6 hours in the kitchen, making the most complicated dessert known to man. Tell me a meal is going to take longer than 30 minutes though, and I will be on the phone for take-out before you blink an eye. Hey, when I'm hungry I'm hungry. I don't want a meal that is going to take a long time.  So, stuffed shells seemed like a Sunday kind of meal. You know the kind that does take a long time and should only ever be made on a weekend. Well- I was wrong. I am woman enough to admit that. Stuffed shells are actually quite easy. 

It was a matter of boiling the shells. Mixing up the ricotta mixture in a bowl. And then you just have to fill the shells! To make matters even easier, I have a time-saving and stress-free way of filling those shells- simply fill a pastry bag (or if you do not have one of those use a zip-lock bag and cut a corner off) and then just pipe the filling into the shells. It was so easy! I then topped the shells with my homemade tomato sauce and parmesan cheese and they were ready for the oven. Voila! Spinach ricotta stuffed shells in a fairly short amount of time. Oh and this is a lightened up version. You just gotta love that.

Spinach and Ricotta Stuffed Shells

Ingredients

  • 2 cups sauce
  • 2 1/2 cups part-skim ricotta cheese
  • 1/2 cup (2 ounces) grated fresh Parmesan cheese 
  • 1/2 teaspoon onion powder
  • 1/2 teaspoon dried oregano
  • 1/4 teaspoon salt
  • 1/4 teaspoon freshly ground black pepper
  • 1 (10-ounce) package frozen chopped spinach, thawed, drained, and squeezed dry
  • 1 large egg yolk
  • 1 garlic clove, minced
  • 24 cooked jumbo pasta shells

Preparation

  1. Preheat oven to 350°.
  2. Spread 1/2 cup tomato sauce over bottom of a 13 x 9-inch baking dish coated with cooking spray.
  3. Combine ricotta and next 8 ingredients (through garlic) in a large bowl, stirring well. Spoon about 1 1/2 tablespoons filling into each pasta shell. Arrange stuffed shells in prepared dish; spread with remaining 1 1/2 cups tomato sauce. Cover and bake at 350° for 30 minutes. Let stand 5 minutes before serving.

Sunday, May 20, 2012

Strawberry Buttermilk Muffins


Leftover buttermilk. What to do? You make these. Strawberry buttermilk muffins with a streusel topping. And you don't look back.  I actually had a container of strawberries in my fridge already so it was a perfect pairing. I found the recipe on bakespace. A great site if you haven't checked it out, you should. It's all about sharing the love of food and recipes.


The fresh strawberries in this recipe were key. The slight tartness with the brown sugar crunchy top had me very guiltily going back for seconds, thirds, ok I don't even want to admit how many I ate yesterday.


The key to any muffin is is NOT to over mix. I always found that frustrating when a recipe says not to over mix. How do you know though?!  I use a spatula when I add my wet ingredients into my dry and just fold them in gently, no more than 10-12 stirs . I still remembering watching an episode of Alton Brown's, Good Eats on Muffins. If you haven't made muffins, or have not had much success in the past I suggest you watch this episode. He goes over in great detail on why you shouldn't over mix and how not to over mix your muffins (he suggests you stir for 10 seconds and then fold in your berries). This recipe has you folding in the berries before you add the wet ingredients, so a 10-second folding should suffice. 


After you have stirred the appropriate time, go ahead fill your muffin tin and sprinkle (generously, please) with your streusel topping. Don't be stingy here on that topping! These muffins definitely are the best when eaten the day of baking. But hey, I had one for breakfast just now and they still were pretty OK in my book. 

Strawberry Buttermilk Muffins
Originally from bakespace.com

Cooking time: 20 minutes
Servings: 12 large muffins, 24 regular

2 1/2 cups all purpose flour
3/4 cup granulated sugar
2 tsp. baking powder
1/4 tsp baking soda
1/4 tsp salt
1 large egg, lightly beaten
3/4 cup buttermilk
2/3 cup canola oil
1 tsp vanilla extract
2 cups chopped strawberries

Streusel Topping:

1/3 cup brown sugar
1/4 all purpose flour
1/2 tsp cinnamon
2 Tbs. butter, softened

Directions:

1. Preheat oven to 375 degrees.
2. Butter muffin tins.
3. Whisk together egg, buttermilk, oil, and vanilla.
4. In another bowl, combine flour, sugar baking powder, baking soda, and salt.
5. Gently fold in berries.
6. Fold wet ingredients into dry.
7. Fill each muffin cup to the top.
8. In a small bowl, combine the streusel ingredients.
9. Blend until mixture is crumbly.
10. Sprinkle over tops of muffins
11. Bake for about 20 minutes, or until the edges of the muffins are golden brown.


Saturday, May 19, 2012

Cinnamon Chip Scones

I hope you are not thinking, *sigh* another scone recipe. It's funny, you know I did not grow up on scones. Probably I only ever heard of scones in a movie or in some book somewhere (if that). I may even possibly never even heard of them until I was in at least my 20's.   Perhaps that is my obsession with them, not having grown up with them. Perhaps it is that they are so easy to make. Perhaps it is well..they are delicious. Perhaps..oh who cares why I love them I just do. I love scones.

When I finally do remembering hearing about scones, I always remember hearing the word, DRY, with them. How sad for scones! And so false! If you haven't ever tried making scones for the same reasons I always had, because they just didn't sound appealing I suggest you give them a try. They do not require a mixer, just your mixing arm, a bowl, a whisk, spatula, and pastry cutter. To make the batter, it is as simple as putting together your dry ingredients, cutting your butter into the bowl, and then adding your other ingredients. From there, you turn your dough onto your counter pat into a circle and cut into wedges. And they are ready for your oven!


For these scones, I had these bag of Hershey's cinnamon chips in my pantry, cupboard, ok fine..a drawer. A small kitchen what can I say? They had been there for at least a month waiting for inspiration when I stumbled upon this recipe on Brown Eyed Baker. She seems to have also quite the love of scones. Smart girl. It was perfect! I could use my cinnamon chips in scones! It was a very aha! duh! moment. 

And true to form..these scones did not last long. 


Cinnamon Chip Scones
From Brown Eyed Baker, originally from Two Peas and Their Pod
Yield: 8 scones
Prep Time: 15 minutes | Bake Time: 15 minutes
2 cups all-purpose flour
1 tablespoon baking powder
3 tablespoons granulated sugar
1 teaspoon ground cinnamon
½ teaspoon salt
5 tablespoons cold, unsalted butter, cut into ¼-inch cubes
½ cup cinnamon chips
1 cup heavy cream
For the Cinnamon-Sugar Topping:
1 tablespoon heavy cream
2 tablespoons granulated sugar
1 teaspoon ground cinnamon
1. Preheat oven to 425 degrees F. Line a large baking sheet with parchment paper or a Silpat and set aside.
2. In a large bowl, whisk together flour, baking powder, sugar, cinnamon, and salt. Cut in the butter, using your fingers, two knives, or a pastry blender. Mix until mixture resembles coarse meal, with mostly pea-size lumps of butter. Stir in the cinnamon chips. Pour heavy cream over the ingredients and stir with a spatula until dough begins to form. Don’t over mix.
3. Transfer dough to a floured countertop and knead dough by hand just until it forms a ball. Form scones by patting the dough into a ¾-inch thick circle. Cut the scones into triangles or use a biscuit cutter for round scones.
4. Place scones on prepared baking sheet. In a small bowl, combine sugar and cinnamon. Using a pastry brush, lightly the scones with heavy cream. Sprinkle scones with cinnamon/sugar mixture. Bake scones for 12 to 15 minutes, or until light brown. Cool scones on a wire cooling rack and serve. Store leftover scones in an airtight container at room temperature for up to 2 days.


Thursday, May 17, 2012

Buttermilk Baked Doughnuts


Don't feel guilty when you look at these photos. Don't pick up your running sneakers just thinking of making these. Believe it or not- these little guys- these sticky, delicious guys are healthy. No, really I promise! Now don't right them off if you are one of those either just because I said the H word. These doughnuts are delicious, guilt-free, and simple (so simple I wonder why I haven't made doughnuts at home before!)  Seriously I was done and outta of the kitchen in less than 20 minutes. How did this doughnut adventure begin you ask on an assuming Tuesday rainy New England afternoon? I had been looking to make something to use up some buttermilk in my fridge. When I was wondering around Target putting too many things in my cart (why is it always this way when you go to Target?) I stumbled upon this.


I had been wanting to get one for awhile. And lo and behold on the back of the pan was a recipe for Buttermilk baked doughnuts. Fate? I think so. And you don't say no to fate. You pick it up, put it in your basket, and immediately head to the register. And I did just that. I honestly was tempted to buy two, but this was the last one. Fate was screaming my name that day.


Now as shorts and cute dress season vastly approaches, making doughnuts on a random Tuesday seemed (albeit the baking gods clearly wanted me to) still a tad wrong. I decided to try making these doughnuts a little healthier. With buttermilk, whole wheat flour, and honey these doughnuts are only around 130 calories. Oh now I have your attention. Yes- 130 calories. I topped them with a simple powdered sugar icing. Next time? I'm thinking nutella ganache. Ok those might need to wait until after summer is over and the shorts have been put away.  For now, it seems you can have your cake, doughnut and eat it too.


Buttermilk Baked Doughnuts
Originally from Health.com

Please note:  These are made with whole wheat flour so they are little more dense then if you make them with just regular flour. The original recipe on the back of the baking pan called for 2 cups of cake flour so if wheat flour isn't your thing or you don't have it on hand try it with cake flour instead. If you don't have cake flour on hand, try make it yourself. Read this article to learn how,  it's so easy and comes out great.

Also, these little guys aren't terribly sweet either. If you want SWEET, use all sugar instead of honey. I also double dipped my doughnuts in the glaze, which I think added the right amount of sweetness these doughnuts needed. Sure a few extra calories, but who's counting?


Ingredients

  • Nonstick cooking spray
  • 1 cup whole-wheat flour
  • 1 cup all-purpose flour
  • 1/2 cupsugar
  • 1 1/2 teaspoonsbaking powder
  • 1/4 teaspoonground nutmeg
  • 1/2 teaspoon salt
  • 3/4 cup low-fat buttermilk (1%)
  • large eggs
  • 1/4 cup honey
  • 2 tablespoons melted butter
  • 1 tablespoon vanilla extract

Preparation

1. Preheat oven to 425°. Lightly coat a doughnut pan with cooking spray.
2. Combine flours and next 4 ingredients (through salt) in a large bowl, stirring well with a whisk.
3. Combine buttermilk, eggs, honey, butter, and vanilla, stirring well with a whisk. Add buttermilk mixture to flour mixture; whisk just until combined.
4. Spoon batter into doughnut pans, filling two-thirds full. Bake in middle of oven until doughnuts spring back when touched and are golden on bottom (about 8 minutes). Let cool in pan slightly (about 4 minutes); turn out. Coat with toppings (see ideas, below), if desired.


Powdered Sugar Icing


2 cups powdered sugar
Whipping cream (I used low-fat milk to cut down on the calories! Use whatever you like)
For powdered sugar glaze:
Whisk powdered sugar and 4 tablespoons whipping cream to blend. Whisk in additional cream, 1 teaspoon at a time, to form medium thick glaze. Can be made up to 3 hours ahead. Dip doughnuts in glaze on one side. Repeat one more time if you would like! Arrange doughnuts, glazed side up, on racks. Let stand until glaze sets.


Sunday, May 13, 2012

Simple Tomato Sauce


I am seriously getting into this whole "d.i.y." thing. You know, do it yourself. It is so much healthier and cheaper, and ok for foodie dorks like myself- fun!  Apparently though, I am a little behind the 8 ball on this recipe. I found it on Annie's Eats, who found it on Smitten Kitchen, who found it on...well the point is...it's been out in the food blog word for awhile. And with three ingredients and one pot needed you can understand why.

This recipe truly is simple and delicious. And I took other's advice to NOT mess with it. Stick to the recipe. Which I admit- I, at first glance, thought..but no garlic?! No basil?! How can this be? Perhaps I will add some. The suggestions that everyone made was do not be tempted to change this recipe. *Sigh*. I surrender. 3 ingredients and one pot. Got it.

Turns out..simple is better. And with only three ingredients, very friendly on the wallet, too. I decided to put the sauce over my spinach stuffed shells. (recipe to come) And for some reason my camera did not save the photo, so I apologize but this is the photo from myrecipes.com.


Simple Tomato Sauce

Note: I used a vidalia onion. They are in season and therefore, a little cheaper. And I adore vidalia onions, with the added sweetness they add.

1 onion, skin removed and halved
5 tbs. butter
1 28 oz. whole plum tomatoes

Combine the tomatoes, onion, and butter in a medium saucepan over medium heat.  Bring the mixture to a simmer, then reduce the heat to keep the sauce at a low, steady simmer for 45 minutes.  Stir occasionally, crushing the tomatoes against the side of the pot with a wooden spoon.  Remove from the heat, discard the onion, and add salt to taste.  (I didn’t add any salt.)  Serve warm with pasta.

Wednesday, May 9, 2012

Vanilla cupcakes with vanilla buttercream


       This cupcake is for all the teachers out there. Teaching. Is. Hard. And Summer. Is. Almost here! On those two notes, doesn't life deserve a cupcake right now? Especially with all the lovely New England sunshine- err, rain we have been having lately.  I do apologize if right now if you are drooling over these cupcakes. I know-Vanilla. The word just screams, "Plain! Boring". But I assure you this little simple package was anything but. I am usually disappointed by vanilla cupcakes I have tried to make at home. However--(are you ready for this next statement?) I do believe I have found my go to vanilla cupcake recipe. And if you know me that is one TALL order. I am always searching for the perfect _______________. Perfect...red velvet. Perfect...carrot cake. The perfect recipe for the best all-american desserts. Oh who am I kidding- the perfect recipe for just about anything you can bake. Why drive myself crazy, you ask? I have absolutely no idea. I am the type of person who if I could afford to would make multiple recipes of vanilla cupcakes to be able to taste test them side by side. I'll leave that to the Cook's Illustrated experts for now.

This cupcake recipe is fairly simple (ok there is a lot of mixing), with not a long list of ingredients. The crumb was fantastically light. Great vanilla taste. The icing- divine. I am honestly surprised I got to the assembling part at all and didn't just lick the entire bowl of batter.

I made these for a last department meeting (so close to summer!) cookout. I love cupcakes. They just put a smile on my face and I figured a cookout to celebrate the end of the school year needed a great cupcake. I chose vanilla because I figured it is an all-around crowd pleaser. And I was right. These didn't last long. I managed to sneak one home for later.

I am now wishing I had snuck two cupcakes.


I used these cute cupcake liners I had recieved as a gift from my sister in a Paula Dean cupcake kit. A well balanced diet is a cupcake in each hand. So true Paula...so true.

Vanilla Cupcakes
Adapted from Annie's Eats

Please note: the original recipe called for vanilla bean. I, having none on hand  (Let's face it vanilla beans are't cheap!) I simply doubled the vanilla extract to 2 tablespoons. If you choose to use the bean (and I only imagine it can enhance an already great cupcake) scrape the vanilla bean seeds into the bowl of the mixer with the butter and discard the pod (or reserve for another use.)  

Ingredients:
3 cups cake flour
1 tbsp. baking powder
½ tsp. salt
16 tbsp. unsalted butter, at room temperature
2 cups sugar
5 large eggs, at room temperature
1¼ cups buttermilk, at room temperature
2 tbsp. vanilla extract
Directions:
1. Preheat the oven to 350° F.  Line two cupcake pans with paper liners.  Set aside.
2. In a medium mixing bowl, combine the cake flour, baking powder and salt.  Whisk together and set aside.
3.Add the butter to the bowl of an electric mixer fitted with the paddle attachment.  Beat on medium-high speed for 3 minutes, until light and creamy in color.  Scrape down the sides of the bowl and beat for one more minute.
4.Add the sugar to the butter mixture, ¼ cup at a time, beating 1 minute after each addition.  Mix in the eggs one at a time until incorporated.  Scrape down the sides of the bowl after each addition.  Combine the buttermilk and the vanilla extract in a liquid measuring cup.  With the mixer on low speed, add the dry ingredients alternately with the wet ingredients, beginning and ending with the dry ingredients and mixing just until incorporated.  Scrape down the sides of the bowl and mix for 15 seconds longer.
5.Divide the batter between the prepared paper liners, filling each about 2/3 of the way full (you will likely have batter left over after filling 24 wells.I managed to make a full 3 dozen cupcakes)  Bake 18-22 minutes, or until a toothpick inserted in the center comes out clean.  Allow to cool in the pans 5-10 minutes, then transfer to a cooling rack to cool completely.  Replace paper liners and bake remaining batter if desired.  Frost cooled cupcakes as desired.
Yield: approximately 30 cupcakes (like I said I got 36 cupcakes!)

Easy Vanilla ButtercreamIngredients:20 tbsp. (2 ½ sticks) unsalted butter, softened2 ½ cups confectioners’ sugar, sifted1/8 tsp. salt2 tsp. vanilla extract2 tbsp. heavy cream  Directions:In a stand mixer fitted with the whisk attachment, beat butter at medium-high speed until smooth, about 20 seconds.  Add confectioners’ sugar and salt; beat at medium-low speed until most of the sugar is moistened, about 45 seconds.  Scrape down the bowl and beat at medium speed until mixture is fully combined, about 15 seconds.  Scrape bowl, add vanilla and heavy cream, and beat at medium speed until incorporated, about 10 seconds.  Then increase the speed to medium-high and beat until light and fluffy, about 4 minutes, scraping down bowl once or twice.  


Monday, May 7, 2012

Salted Caramel Chocolate Chip Cookies Bars

 You know a recipe is good when someone says, "I wish you hadn't cut them so small!" I had a faculty meeting to attend and it was our team's job to provide the snacks. I, of course, chose to make something sweet (always looking for an excuse to bake and try a new recipe!)

Chocolate and caramel. Sweet and salty Yum and yum. Two blissful reunions made in heaven. The original recipe used caramel candies to make the salted caramel sauce. I wanted to try my hand again at making caramel. I really truly believe a person (albeit- chef, doctor, whoever) is as only as good as their tools. In my case- a candy thermometer. I used my candy thermometer, but luckily grabbed the pot off the stove before my precious caramel went from perfect to burnt.  If you have never made caramel- trust me, the perfect to burnt timing happens very, very quickly.  My thermometer, unfortunately did not reach all the way into the caramel. (Seriously, who designed this?!?) After making these bars, I am already on the hunt for a better thermometer.  Any suggestions?

So if making caramel scares you, try using the candies. Either way find a way to make these! And take my co-worker's suggestion..don't cut them so small!


Salted Caramel Chocolate Chip Cookie Bars
Originally from Two Peas And Their Pod

Note: If making caramel using the candies, substitute the homemade caramel sauce with
10 oz. of caramel candies (unwrap them of course!) with 3 Tbs. of heavy cream. In a large microwave safe bowl, combine the caramels and heavy cream. Microwave caramels on High until caramels are melted, stirring every 20 seconds. This will take about 2 minutes, depending on your microwave.

Ingredients:

2 1/8 cups all-purpose flour
1/2 teaspoon salt
1/2 teaspoon baking soda
12 tablespoons butter, melted and cooled to room temperature
1 cup light brown sugar
1/2 cup granulated sugar
1 large egg
1 large egg yolk
2 teaspoons vanilla extract
2 cups chocolate chips
1/4 to 1/2 cup of salted caramel sauce (I tended to lean towards the more side with this stuff)
Sea salt, for sprinkling over caramel and bars

Directions:

1. Preheat oven to 325 degrees F. Spray a 2-quart baking pan (which is an 11 X 7 pan-I used a glass Pyrex dish) with nonstick cooking spray and set aside.
2. In a medium bowl, whisk together flour, salt, and baking soda. Set aside.
3. In the bowl of a stand mixer, mix the melted butter and sugars together until combined. Add the egg, egg yolk, and vanilla extract and mix until smooth. Slowly add the dry ingredients and mix on low, just until combined. Stir in the chocolate chips.
4. Divide the cookie dough in half. Press half of the cookie dough into the prepared pan, smoothing the top with the spatula. Pour hot caramel over the cookie dough. Sprinkle caramel with sea salt. Drop spoonfuls of cookie dough over the caramel and spread dough with a spatula until the caramel is covered. Sprinkle the bars with additional sea salt.
6.Bake cookie bars for 30 minutes or until the top of the bars are light golden brown and the edges start to pull away from the pan. Cool bars on a wire rack to room temperature. Cut bars into squares and serve.


Salted Caramel Sauce:
Originally from Baked bakery, in NYC

* 1 cup sugar
* 2 tablespoons light corn syrup
* 1/2 cup heavy cream
* 1 teaspoon fleur de sel (I used the sea salt I had in my cupboard and it seemed to be just fine!)* 1/4 cup sour cream

Directions
1. Combine 1/4 cup water, sugar, and corn syrup in a medium saucepan; stir to combine. Bring to a boil over high heat. Cook until the mixture reaches 350 degrees on a candy thermometer, about 10 minutes.
2. Meanwhile, in another small saucepan, mix together cream and salt. Bring cream to a boil and cook until salt has dissolved, 3 to 5 minutes. Remove from heat and set aside.
3. When the caramel mixture has reached 350 degrees, remove from heat and allow to cool for 1 minute. Carefully add the hot cream to the caramel; stir to combine. Whisk in sour cream. Cool, and store in an airtight container, refrigerated, for up to 3 days.